BYP43 Ympyrä Video Recording Studio instructions
 Staff can book the studio space through the KOVS system at https://kovs.jyu.fi. Students can make a reservation using the room booking feature in the MyJYU app. The electronic key can be picked up from the janitors’ desk on the 1st floor of Lähde and returned to the same place after use.
General Operating Instructions
The Ympyrä (BYP43) studio space is available for use by university students and staff during the opening hours of the Lähde building. Check the building opening hours on the University Services website.
The studio is intended solely for university-related video and audio recording purposes.
- Do not bring food into the studio.
- Do not disconnect cables or change the equipment settings.
- Do not take the equipment outside the studio space.
In case of problems, send a support request to the video support team:
- Through the HelpJYU service.
- In urgent cases, call the video support number at 029 441 8016 (weekdays 9:00-16:00).
Always ensure the studio door is locked when you leave the space.
Turn off the screens and lights after use. There is no need to turn off the computer and the Epiphan recording device; just log out of the computer.
During your reservation, you are responsible for the equipment in the space - do not let unauthorized persons into the studio.
To ensure that as many people as possible can use the studio, reservations can be made for a maximum of two days per week per user/course. For more extensive usage needs, please contact the video support team.
By default, the Ympyrä studio is a self-service space, meaning video support staff are not present. However, upon request and depending on availability, we are happy to provide guidance and assistance in starting the recording.
When you arrive at the studio
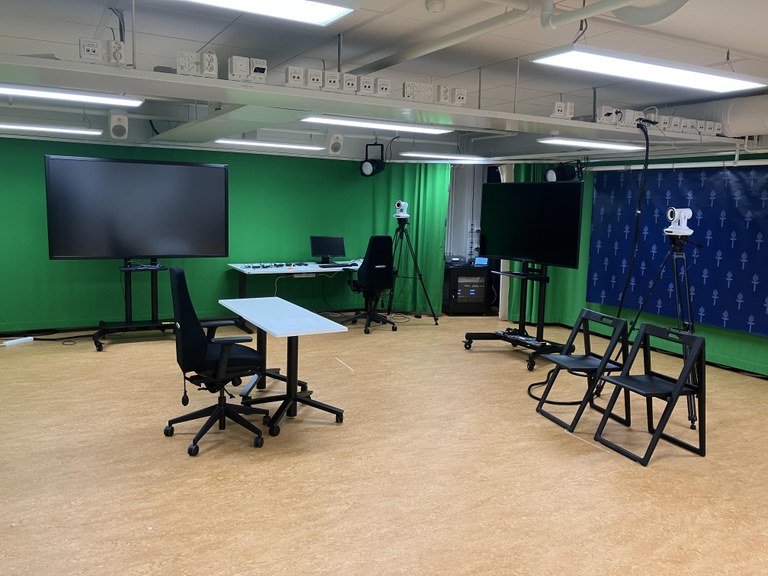
The studio also has three movable tables and chairs that you can use as needed for your recordings.
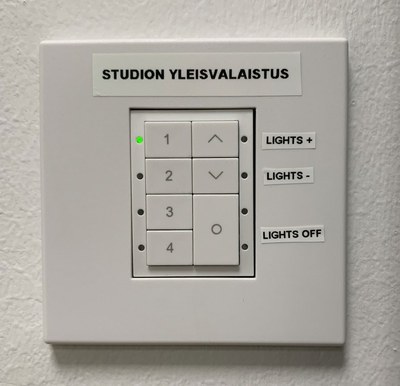
The general lighting in the space turns on automatically upon entering the room, but you can adjust the brightness using the light buttons by the door. Please note that for green screen recording, the lights should be set to the brightest setting (1). For recording in the vodcast corner, the best setting is light setting 3.
1. Initial Preparations
Cameras, Monitors, and Lights
Turn on the camera and studio lights using the POWER switch on top of the equipment rack. Press the touch screen of the Epiphan Pearl 2 recording device to wake it from standby mode. Press “start” on the AMX touch panel. If you want to connect your own laptop as a video source, you can connect it using an HDMI cable, of which there are two located in different parts of the studio. The “Laptop 1” cable is found at the back of the studio near the green screen wall, and the “Laptop 2” cable is on top of the equipment rack.
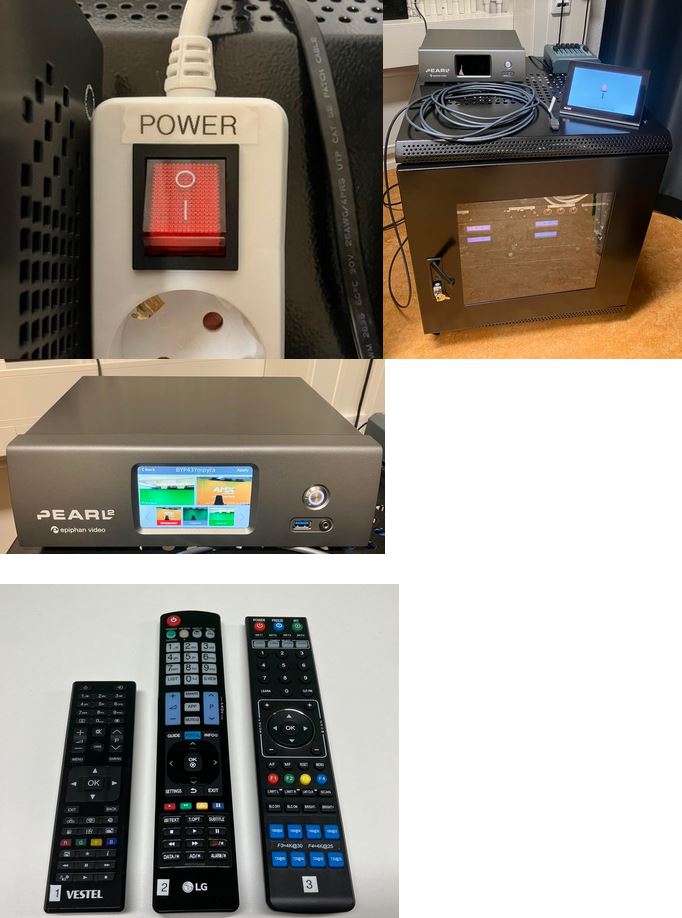
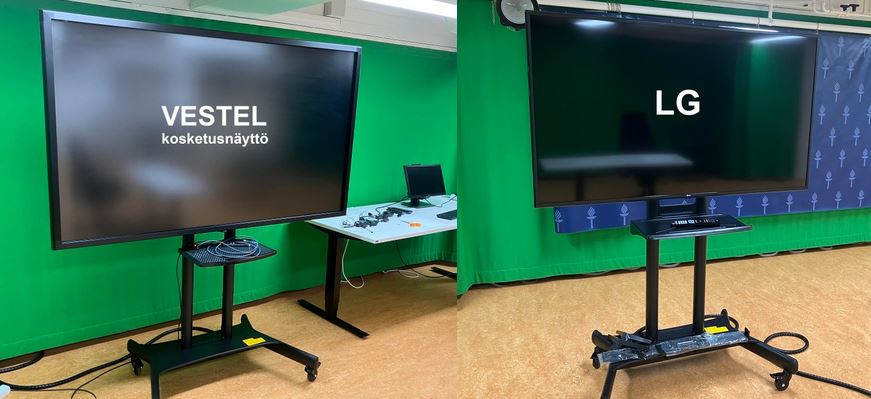
The studio has three numbered remote controls used to operate the Vestel touch screen (1), the LG monitor (2), and the green screen camera (3).
Turn on the necessary monitor screens with remotes 1 and 2. The larger Vestel touch screen can be used, for example, to display teaching materials. The LG monitor can be used to monitor the image currently being recorded. If desired, you can also set the Vestel screen to monitor the recorded image and move it to a suitable position in the studio.
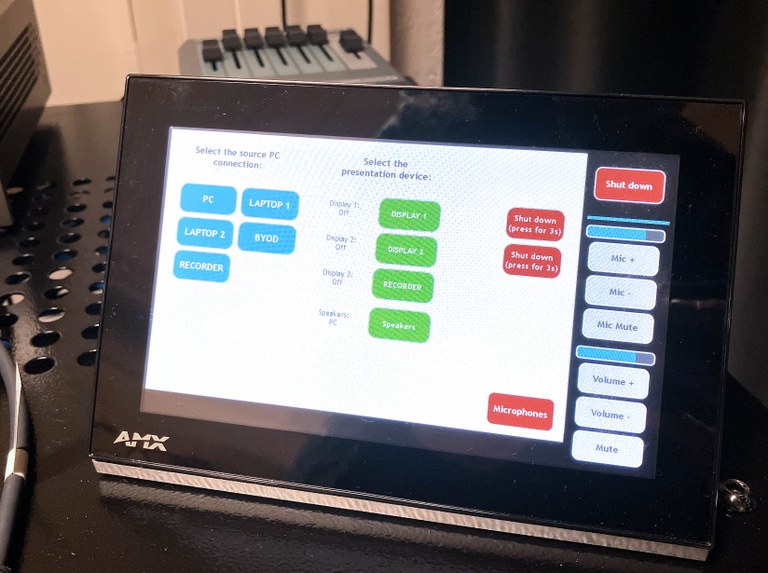
The AMX touch panel on top of the equipment rack controls the studio’s video and audio system. On the left, you can first select the video source (blue squares) you want to use and then one or more targets to which you want to send this image (green squares).
Video Sources:
- PC: The studio’s own computer, which can be controlled either with a wireless keyboard and mouse or the Vestel touch screen.
- Laptop 1: HDMI input for your own laptop at the back of the studio in front of the green screen wall.
- Laptop 2: HDMI input for your own laptop on top of the equipment rack.
- Recorder: The image recorded by the recording device.
Where the image is directed:
- Display 1: Vestel touch screen.
- Display 2: LG monitor.
- Recorder: Recording device.
For example, if you want the computer’s image on the Vestel touch screen, first press PC from the blue squares and then Display 1 from the green squares. Now you can use the computer via the touch screen. If you want to record the image from your laptop, first press Laptop 1 or 2 from the blue squares (depending on which cable you have connected the laptop to) and then Recorder from the green squares.
Position the camera(s) appropriately in the studio, depending on the shooting direction. Ensure that the image is visible on the recording device’s touch screen and the desired monitors. You can move the Vestel touch screen on wheels either out of the shot or to a suitable position within the shot for displaying presentation materials (see more detailed instructions on using the touch screen in “Example 1”).
When shooting against the green screen wall, use the studio lights installed in the ceiling for additional lighting. The relative levels of the lights are pre-set, so no adjustments are needed. If the lights are not on, raise the rightmost MASTER slider to the level marked with tape.
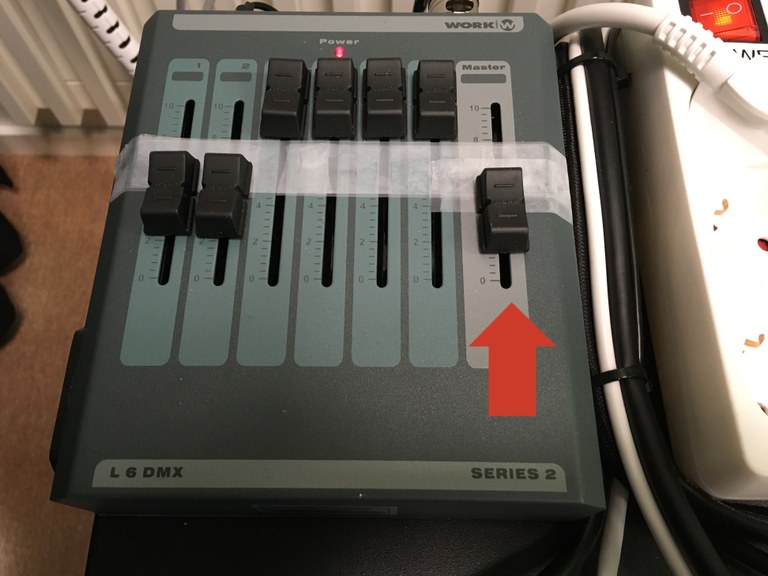
For more details on using the green screen wall, see Example 2.
Audio
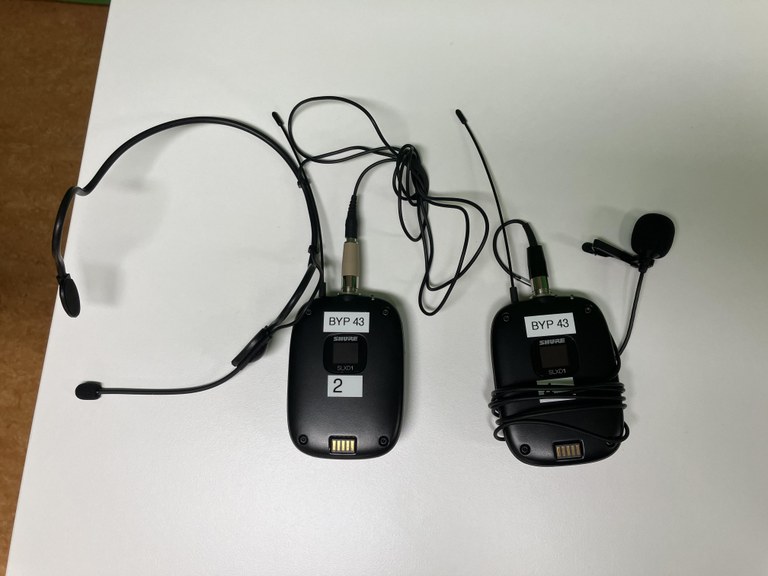
Audio is recorded using wireless lapel or headset microphones, which can be found on the side table in the studio. Attach the microphone and turn on the transmitter using the switch on the top. Please note that there are no other connected microphones in the studio - if the wireless microphones are not used, no sound will be recorded. Therefore, always check before starting the recording that the audio meter on the recording device moves in sync with the speech. Use only as many microphones as there are speakers. To minimize interference, avoid touching the microphone cable during recording. We strive to keep spare batteries available on the studio table. If the batteries run out, please contact the janitors.
2. Recording
Recording is done using the Epiphan Pearl recording device located on top of the equipment rack. The device is operated via the touch screen on the front. You can select the camera image and various layout options from the screen.
Perform the following steps before starting the recording:
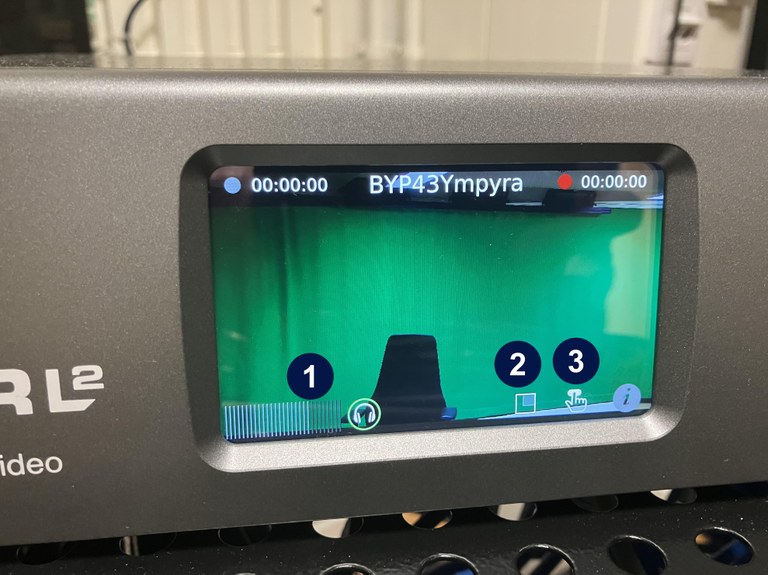
- Check that the microphone is working and the audio level meter moves when speaking.
- If necessary, change the recording layout (see detailed instructions on this page).
- Open the recording view.
Selecting the Layout
You can choose a layout suitable for the situation - options include images from different cameras, various combinations of computer and camera images, and the green screen function. Open the layout selection view by pressing the “square icon” on the recorder’s home screen. The layout can also be changed during recording.
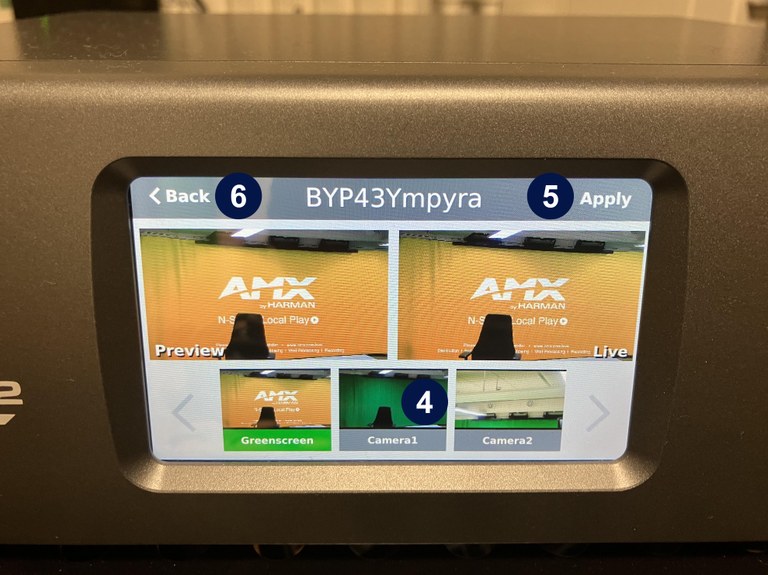
- First, select the desired layout by pressing the preview image at the bottom of the screen. The image will appear in the Preview box at the top.
- Confirm the layout selection by pressing “Apply” in the top right corner. The image will move to the Live box on the right.
- Return to the home screen by pressing “< Back”. Now you can check that the correct image is displayed on the home screen.
Starting the Recording
When you are ready to start recording, open the recording start view (“Launcher”) by pressing the “finger icon” on the home screen (see step 3 in the previous image):
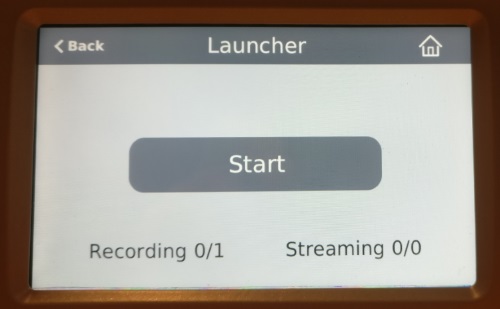
Press the “Start” button to begin recording. The recording has started successfully when the “Stop” button appears on the screen and “Recording 1/1” is displayed at the bottom. You can then return to the home screen by pressing the “< Back” button in the top left corner.
When you are ready to stop the recording, press the “Stop” button. You can restart the recording at any time, creating a new separate video recording on the device.
NOTE! There is about a 1-second delay on the touch screen after pressing before the recording starts/stops.
Requesting the Publication of the Recording
When the recording is finished, send a request to publish the recording to the video support team using the following HelpJYU form:
http://r.jyu.fi/tilatallenteenjulkaisu
The video support team will process your request as quickly as possible and publish the video on Moniviestin. If you want to edit the video yourself before publication or if you want the video file in mp4 format, you can indicate this on the same form.
3. Examples of Studio Use Cases
Example 1. I want to record an instructional video, discussion, or speech
Place the camera on a tripod on the opposite side of the room. Move the LG monitor to a suitable position and turn it on with remote control (2) so you can use it to monitor the image.
Take a wireless microphone from the top shelf of the cabinet, turn it on using the switch on the top, and check the audio on the Epiphan recorder’s touch screen. When the microphone is working, the audio bar at the bottom of the screen will move in sync with the speech. Select the desired camera (camera 1 or 2) or a combination of camera and computer image from the Epiphan recorder’s layout menu. Press “back” to return to the preview screen.
If you want to use the Vestel touch screen in the video, move it to a suitable position in the shot. Select either PC (the studio computer) or Laptop 1/2 from the AMX touch panel if you have your own laptop with you. There are two HDMI cables in the studio for your laptop, located in different parts of the room and labeled “Laptop 1” and “Laptop 2”. The studio computer can be controlled with the touch screen as well as the wireless keyboard and mouse in the room.
When you are ready, press the finger icon on the recorder and start the recording by pressing “Start”. When you want to stop the recording, press “Stop”.
Example 2. I want to record a video with a green screen background
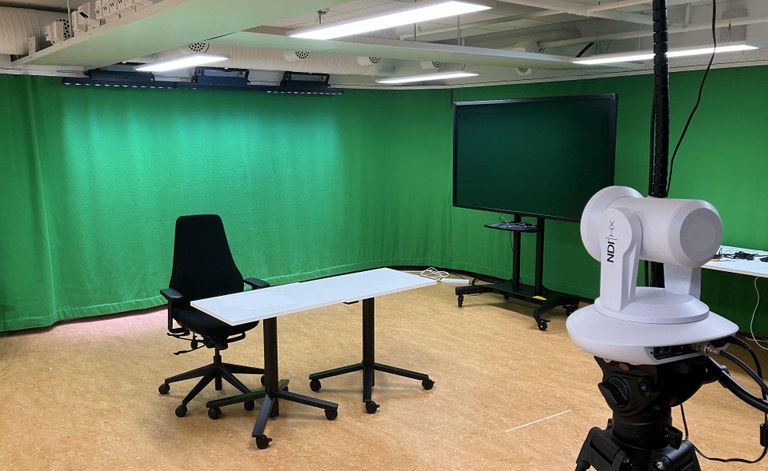
For green screen recording, use the ceiling-mounted remote-controlled camera. The speaker should stand in front of the long green back wall of the studio, where the lights are also directed. Raise the rightmost slider (MASTER) on the light controller on top of the equipment rack to the level marked with tape. Select PC as the video source from the blue squares on the AMX touch panel and presentation device: Recorder from the green squares. Choose the first option (green screen) from the layout options on the Epiphan recorder. The green background will automatically be replaced by the computer image in the recording. Press back to return to the preview.
Turn on the Vestel screen with the remote control. Use the wireless mouse and keyboard to control the computer. When Recorder is selected as the video source for the Vestel screen from the AMX panel, you will see the final green screen shot on the large screen and can also control the computer through it. If you want to move the camera or zoom in/out, you can do so with remote control 3.
Take the required number of wireless microphones from the cabinet and turn them on. Check the audio on the recording device’s audio meter.
When you are ready, press the finger icon on the recorder and start the recording by pressing “Start”. When you want to stop the recording, press “Stop”.
Tips for successful green screen recording:
- Green-colored clothing does not work well on green screen video.
- If you stand too close to the wall, shadows may appear behind you, causing interference in the image.
Example 3. I want to record a podcast
Take the required number of wireless microphones from the cabinet and turn them on. Check in the preview of the Epiphan recorder that the audio meter moves in sync with the speech for each microphone.
Press the finger icon on the recorder and start the recording by pressing “Start”. When you want to stop the recording, press “Stop”. If you only want to use the audio track when publishing, the recorded video image does not matter - it can be disregarded.
Instructions for Using the Vodcast Corner
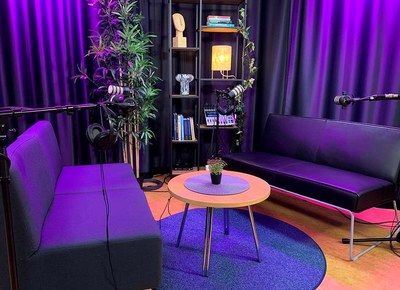
The BYP43 Ympyrä Studio has a Vodcast Corner, specifically designed for recording podcasts both as video and audio. The sofa area is equipped with microphones and headphones for four simultaneous speakers. For audio-only podcast recording, a Zoom Podtrack P8 audio recorder is available, and for video vodcast recording, there is a JVC 4K video camera in the studio corner.
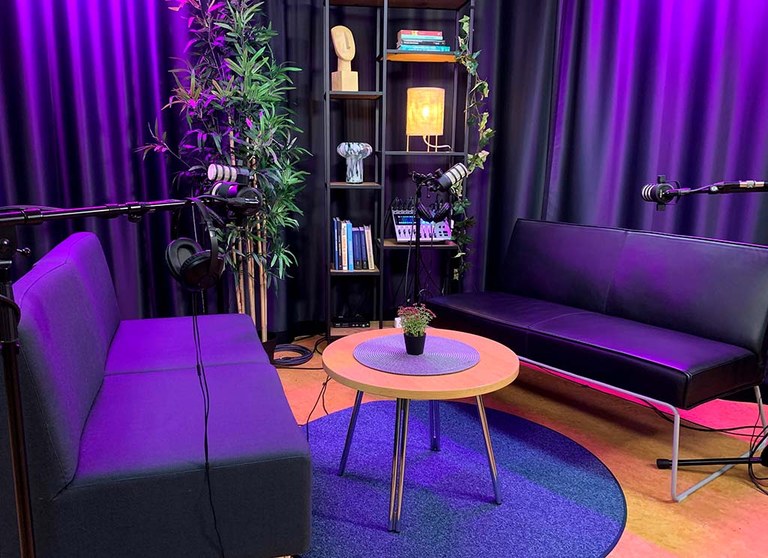
Preparations for the Vodcast Corner Before Starting the Recording
Turn on all the lights in the vodcast corner. The power switches for the ceiling-mounted panel lights are on the back panel of the lights, and the brightness is adjusted with the left rotary knob. The power switches for the curtain lights are on the edge of the light facing the floor, and the power switch for the desk lamp on the shelf is on the lamp’s cord.
Ensure that the general studio lighting is set to light setting number 3 (the light switch is on the wall next to the entrance).
Turn on the Zoom audio recorder on the shelf (the power switch is on the back of the device, on the right side). This device must also be turned on when making video recordings in the vodcast corner, as the audio from the video camera also goes through this device.
Check that the colored level meters move on the recorder’s screen for all speakers. Each of the four microphones has its own meter. The microphones are connected to the recorder’s audio channels 1-4, so the sliders for the microphones in use should be in the up position, i.e., open.
Turn on the JVC video camera. The power switch is on the upper left side of the camera. The power switch has a “safety lock,” so to move the switch, you need to press the small button in the middle of the switch. Check on the camera screen that the image is framed correctly and the lighting looks good through the camera.
Now you are ready to start recording.
Starting the Recording
Audio-Only Recording (Podcast)
Recording is done with the Zoom Podtrack P8 recorder on the shelf in the vodcast corner and four wired microphones.
When you are ready to start recording, press the rec button (red circle symbol) in the bottom right corner of the device.
Recording stops with the stop button (white square symbol).
Video and Audio Recording (Vodcast)
Video recording can be done simultaneously on both the JVC video camera’s memory card and the Epiphan recording device. You can copy the files from the camera’s memory card immediately to your device or network drive. Videos recorded via the Epiphan device can be requested for download or publication on Moniviestin through a HelpJYU support request.
Recording with the JVC Video Camera:
- Ensure the camera is powered on and the image is properly framed.
- Check that the audio meter on the camera screen moves when speaking into the microphones. Note that only the wired microphones in the vodcast corner are recorded by the camera. Wireless headset microphones are not recorded this way.
- Ensure there is a memory card in the device and that it has space (the card slot is on the left side of the camera, and the remaining recording time on the card is displayed in the top left corner of the camera screen).
- When you are ready to start recording, press the Rec button on the right side of the camera.
- Stop the video recording by pressing the same Rec button that started it.
Recording with the Epiphan Recording Device:
- First, refer to the general instructions for using the recording device earlier on this page.
- Select the “Vodcast” layout from the Epiphan recorder’s layout options. The image from the JVC video camera should now appear on the recorder’s screen.
- Ensure that the audio meter visible on the recorder’s screen moves when speaking into the microphones. When recording with the Epiphan device, you can use the studio’s wireless headset microphones. The wired microphones in the vodcast corner are recorded by the Epiphan device when the Vodcast layout is selected.
- Start the video recording by pressing the finger icon on the touch screen, then the Start button.
- Stop the video recording from the same control view by pressing Stop.
Transferring Recordings to Your Device
Both the Zoom audio recorder and the JVC video camera use SD memory cards for recordings. There is a USB-A card reader on the studio desk that you can use with either the studio computer or temporarily connect to your own computer. The same general instructions apply to both devices:
- Turn off the power to the device from which you are removing the memory card.
- Locate the memory card slot and remove the card from the device:
- In the Zoom audio recorder, the card slot is on the left side of the back panel under a plastic cover. Open the cover and press the memory card to eject it.
- In the JVC video camera, the card slot is on the left side of the device. Slide the transparent cover away from the card slot and press the memory card to eject it.
- Copy the recordings to your network drive or device.
- Delete your recordings from the card after a successful copy to ensure they are not accessible to others and to free up space for the next users.
- Insert the memory card back into the device. Memory cards must not be borrowed or taken outside the studio!
After Recording
Once the recordings are done and the files have been saved, it’s time to turn off the equipment and lights and restore the furniture arrangement if any changes were made. Follow this checklist:
- Turn off all studio lights (panel lights, curtain lights, bookshelf lamp). The general room lighting, i.e., the regular ceiling lights, will turn off automatically when you leave the room.
- Turn off the Zoom audio recorder and the JVC video camera.
- There is no need to turn off the Epiphan recording device or the studio computer; they will automatically enter power-saving mode.
- If any furniture or equipment has been moved, please restore the room to its original arrangement as shown in the image at the beginning of the vodcast instructions.
- If you notice any deficiencies or technical issues with the studio or vodcast corner equipment, please report it immediately to the video support team either via the HelpJYU support request form or by phone at 029 441 8016 (weekdays 9:00-16:00).
